Filming Mountain Highways With Matrice 4: Flight Altitude
Filming Mountain Highways With Matrice 4: Flight Altitude, Signal Discipline, and Why Structure Thinking Matters
META: Expert how-to for filming highways in mountain terrain with Matrice 4, including optimal flight altitude, transmission planning, thermal workflow, photogrammetry support, and operational safety tips.
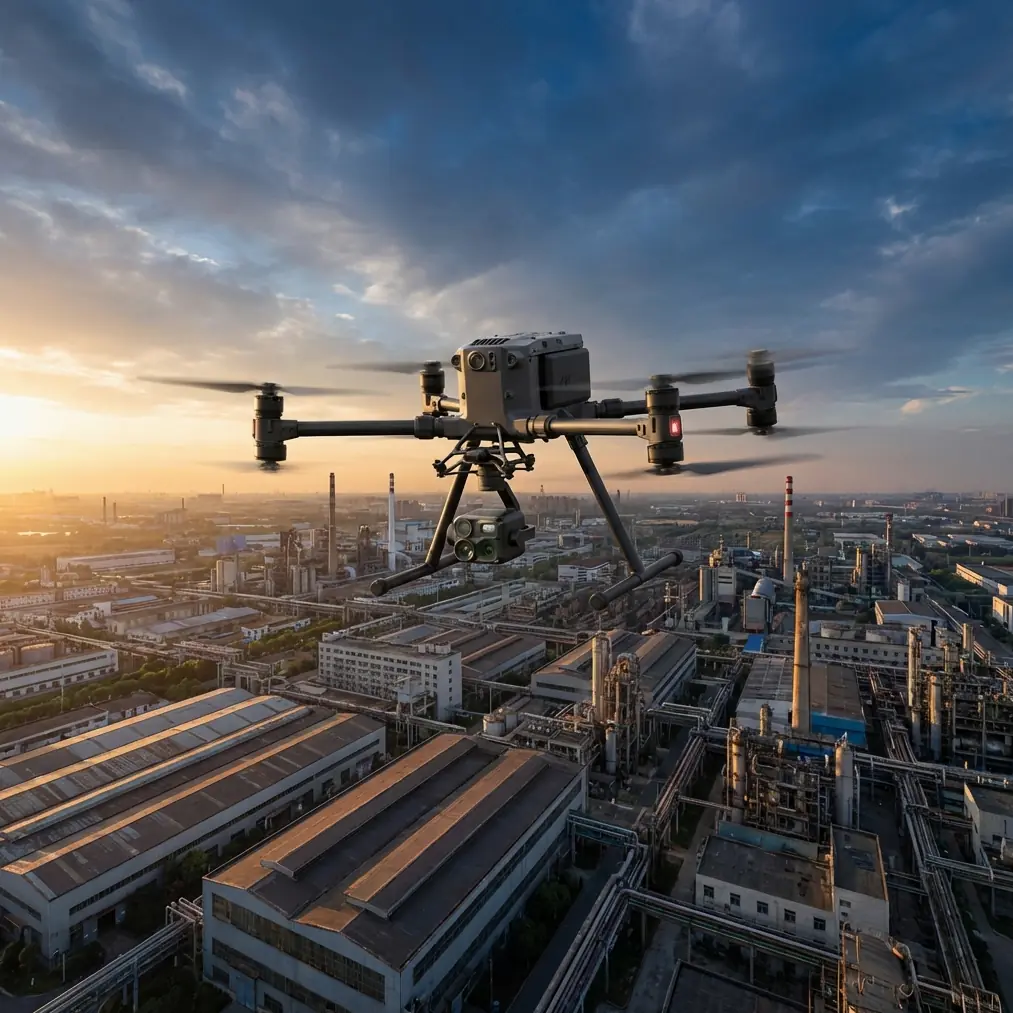
Mountain highway work exposes every weakness in a drone operation. Wind wraps around ridgelines. Signal paths vanish behind cut slopes. Asphalt shifts from bright specular glare to deep shadow in a few seconds. If you are planning to film roads with the Matrice 4, the platform matters—but the bigger factor is how you set up the mission.
The most useful question is not “What camera mode should I use?” It is this: what flight altitude gives you stable coverage, safe terrain clearance, and footage that still reads as a highway rather than a map?
For most mountain highway filming with Matrice 4, I recommend starting with a working band of roughly 60 to 90 meters above the road surface, then adjusting by terrain geometry rather than sticking to a fixed launch-point altitude. That range is practical because it solves three competing problems at once. First, it keeps enough vertical separation from light poles, signs, and cable crossings. Second, it preserves road context—lane shape, retaining walls, switchbacks, cut-and-fill transitions. Third, it avoids the overly flat look you get when the aircraft climbs so high that the road becomes a thin graphic line.
That altitude is not a rule. It is a baseline. In mountain work, the road is the subject, but the terrain is the real boss.
Why altitude has to be tied to the road, not the pilot
Pilots who are excellent on flat corridor jobs often run into trouble in mountains because they unconsciously reference altitude from takeoff location. On a highway cut into a slope, that number becomes misleading almost immediately. A drone that is 80 meters above the pilot may be only 25 meters above an uphill rock face after one bend. It may also be 140 meters above the downhill valley side, which changes the visual compression of the shot and can make the road lose presence.
With Matrice 4, the cleaner workflow is to think in terms of consistent height above the road corridor. If the assignment is cinematic documentation, keep the aircraft offset enough to show grade changes and engineering features. If the assignment supports inspection or progress recording, fly with repeatable geometry so future flights can match.
This is where the photogrammetry mindset helps even if you are not building a full 3D model. Road projects benefit from disciplined geometry. If you intend to pair video with orthomosaic or corridor mapping later, use GCP-backed reference points and maintain predictable passes. A lot of teams separate “film flights” from “survey flights” too aggressively. In practice, when your mountain mission is designed well, the footage and the data collection can support each other.
The best shot angles for mountain highways
Highways in mountains look dramatic from almost anywhere, but not every dramatic shot is useful. I usually break the mission into four visual layers.
1. Oblique corridor reveal
Fly offset from the road centerline with the gimbal angled down moderately, not straight down. This is the best general-purpose establishing shot because it shows how the carriageway fits the terrain. At 70 to 90 meters above road level, curves read well without flattening the scene.
2. Forward tracking along a bend sequence
For this, lower can work better—often 50 to 70 meters above the surface—provided the terrain is open and obstacle-checked. The goal is to preserve speed and perspective. If you stay too high, the sequence becomes cartographic rather than cinematic.
3. Elevated side profile over cut slopes or bridges
This is where a slightly higher stand-off is useful, especially if the road is built into steep terrain. You want enough distance to keep the aircraft out of turbulent rotor zones while still showing the structural context.
4. Top-down technical pass
This one is less emotional and more analytical. It is useful for construction progress, drainage lines, lane markings, and retaining geometry. If your client includes engineers, this pass often ends up being more valuable than the flashy shots.
The Matrice 4 earns its place on these jobs because it can move between those roles without turning the day into a platform change exercise.
O3 transmission in mountain terrain: line of sight is never as simple as it looks
A highway winding through mountains can look open from the air but be hostile to transmission. Ridges, cut faces, tree bands, and concrete structures all interfere with clean links. This is why I treat O3 transmission planning as part of route design, not a background feature.
In mountains, maintain line-of-sight not just between pilot and drone, but between pilot and the likely signal path. The aircraft can appear visible while the radio path is partially masked by terrain. That tends to show up first in live-view instability at exactly the moment the pilot is trying to hold a smooth reveal around a ridge shoulder.
The practical fix is old-fashioned: reposition often. Leapfrog your control points along the corridor rather than trying to dominate the whole route from a single turnout. Shorter, cleaner segments beat one heroic long run every time.
If your operation includes sensitive project imagery—new road alignments, restricted industrial access, private infrastructure—use AES-256 transmission security as a policy feature, not a checkbox. Encrypted links matter most when multiple contractors, public observers, and mobile devices are present near the work zone. Mountain roads attract attention. So do drones.
Wind, turbulence, and why “good weather” can still produce bad footage
Pilots often check broad forecast numbers and assume that a calm morning means a calm mission. In mountain corridors, local airflow can turn that assumption inside out. Wind spilling over a ridge can create rough air on the leeward side even when the valley floor feels manageable.
The giveaway is not always aircraft speed. Sometimes it is gimbal correction behavior and micro-jitter in the shot. If your footage starts to look nervous near exposed cut slopes, do not just tweak speed. Change your lateral offset and altitude. A small vertical move can shift the drone out of a dirty air band.
This is another reason I like the 60-to-90-meter starting range. It gives enough room to adapt. Flying too low in mountain terrain often creates more turbulence problems, not fewer.
Thermal signature work: not just for dramatic visuals
The term thermal signature gets thrown around loosely, but on highway projects it has some legitimate civilian value. If your Matrice 4 payload configuration supports thermal viewing, use it strategically rather than as a novelty overlay.
On mountain roads, thermal can help identify:
- drainage or moisture behavior near retaining structures,
- unusual heat concentration from equipment staging zones,
- pavement temperature differences during paving windows,
- vehicle movement patterns in low-contrast dawn conditions.
That does not replace engineering inspection. It improves situational awareness and can guide where your visible-light passes should focus. If the reader scenario includes filming rather than pure surveying, thermal clips also add context when documenting the operational environment—especially during early or late light when visible contrast is inconsistent.
Hot-swap batteries change how you sequence the corridor
Battery strategy is not glamorous, but it shapes the result more than most camera settings. On mountain highway jobs, hot-swap batteries are useful because the terrain punishes slow turnarounds. If a weather gap opens, you want the aircraft back up quickly while the light stays consistent on the road face you are documenting.
The mistake I see most often is using each battery cycle for a random mix of shot types. A better approach is to assign one battery set to one visual objective:
- Battery 1: wide corridor establishes
- Battery 2: low oblique tracking runs
- Battery 3: technical top-down or photogrammetry support
- Battery 4: pickups and thermal overlays
That structure produces cleaner continuity and easier postproduction. It also reduces the temptation to squeeze “one more pass” out of a pack when the aircraft is already a long way down-corridor.
Borrowing a lesson from aircraft structural design
One of the more interesting reference points for serious drone operations comes from manned-aircraft maintenance philosophy. In the aircraft design handbook material, there is a concept called EDR, where the document states: EDR = timely detection index + sensitivity index. In plain language, it is a way of deciding whether deterioration or damage can be discovered before safety margins are eroded.
That idea translates surprisingly well to mountain highway drone work.
Think about your own mission setup. How easy is it to detect problems early? Battery degradation, prop wear, antenna positioning, lens contamination, thermal drift, GNSS inconsistency near rock walls—these are your operational equivalents of “environmental degradation.” The same handbook section also emphasizes that accessibility for the required level of visual inspection is a key factor in arranging maintenance work. That matters for Matrice 4 crews because mountain jobs are dusty, windy, and often rushed. If your preflight inspection routine is hard to perform properly from a roadside pull-off, it will be skipped.
So build the operation around detectability:
- Clean, repeatable preflight checks.
- Easy access to props, sensors, connectors, and payload interfaces.
- Battery logging that catches decline before it becomes a field problem.
- Short mission legs that expose performance changes quickly.
That is how you turn an advanced drone into a reliable field tool rather than an expensive camera that happens to fly.
Materials matter more than most pilots think
Another useful engineering clue comes from the reference material on thermoplastics in aircraft applications. It notes practical uses for materials such as ABS, polycarbonate, nylon, FEP, and E-CTFE, including roles in instrument panels, connectors, insulation, coatings, tubing, and wire protection. Why should a Matrice 4 operator care?
Because mountain highway flights are rough on exactly those categories of components. You are working with temperature swings, UV exposure, dust, abrasion, vibration, and frequent packing/unpacking from vehicles. When a drone system is built around durable polymers, coatings, insulated wiring, and impact-tolerant housings, that is not a spec-sheet footnote. It affects downtime.
Take polycarbonate, for example. The source notes its strong optical and electrical-use suitability. In field equipment terms, materials with that kind of profile are valuable anywhere impact resistance and visibility matter. Nylon, especially when enhanced for wear resistance, matters for moving-contact parts and repeated handling environments. These are not abstract aircraft textbook details. They point to the same truth every road-corridor crew eventually learns: mountain filming is a durability test disguised as a camera assignment.
BVLOS thinking, even when you are not flying BVLOS
The phrase BVLOS gets attention for regulatory reasons, but the planning logic behind it is useful even for standard visual-line-of-sight operations. Highway filming in mountains benefits from corridor segmentation, communications discipline, alternate recovery points, and route-wide awareness of terrain masking. Those are BVLOS habits. They improve ordinary missions too.
Before launch, mark:
- pilot positions,
- observer positions if used,
- emergency landing areas,
- road bends likely to block signal,
- sections with reflective surfaces or low-contrast backgrounds,
- traffic management considerations.
If you want to compare route options or sense-check your mission design, send your corridor sketch through this Matrice 4 planning chat before the field day. A five-minute review can save a battery set.
A practical altitude workflow for your next mission
If I were briefing a Matrice 4 crew for a mountain highway filming day, this is the sequence I would use:
Start at 80 meters above the road corridor for your first establishing run.
That height usually gives enough separation and readable context.
Drop to 60 to 70 meters for tracking curves if obstacles and air movement allow.
This adds speed and depth without making the aircraft feel trapped by terrain.
Climb above 90 meters only when the geography demands it, such as tall cut faces, bridge transitions, or when you need to open the relationship between road and valley.
Do not climb just because the view looks bigger. Bigger is often worse.
Use terrain-based checkpoints, not pilot-based altitude memory.
Every major bend can change your safe clearance picture.
Reserve one battery cycle for repeatable technical passes.
Even if the client asked mainly for video, repeatable geometry often becomes the most reusable deliverable later.
Check live transmission quality before entering masked sections.
Never assume O3 will brute-force through terrain logic.
Use thermal only where it adds interpretive value.
On mixed-purpose jobs, thermal is strongest when it answers a site question.
The Matrice 4 can produce excellent mountain highway footage, but the best results come from disciplined flying rather than dramatic flying. Hold the aircraft high enough to stay ahead of terrain and turbulence, low enough to keep the road legible, and structured enough that every pass has a purpose. That is the difference between pretty clips and a professional corridor mission.
Ready for your own Matrice 4? Contact our team for expert consultation.